One of the things I spent hours upon hours doing in the months before I did the Spine Challenger, was to research kit. I spent time reading every race report that I could find, which gave me valuable insight into what to expect and what to take with me. I spent time on the internet, reading about all the different types of kit available, at different prices, and their advantages and disadvantages. And the finally, and most importantly, I tried everything I bought to see if it did what I wanted.
So I’m going to run through the kit I ended up with, and why, and whether it worked for me. To understand my experience of the event itself, you can read my race report HERE, which may be useful as I will refer to certain things that happened.
I should make clear that I was only looking to complete, rather than compete, which means that I worried about weight from a comfort point of view (i.e. I didn’t want my back to hurt) rather than needing to run with my pack. I couldn’t in fact run very far with my 8kg pack, but a strong hike got me finished on 43.5 hours, which was better than expected.
Clothing first:
From the ground up:
Shoes – I ended up using 2 pairs of non-gore-tex Innovate Rocklite 305’s. They have great grip, and are quite comfortable. In training I have run long runs in them on pavements, as well as hiking over rough terrain, so they are fairly versatile (i.e. not just hiking boots or trail running shoes). With 2 pairs, I was able to change for clean ones halfway, which meant my feet got a rest. There was lots of debate about whether Gore-Tex shoes were worth it, but the overall consensus seemed to be that Gore-Tex will keep the water inside the shoes once it gets in, where as non-waterproof shoes with quality waterproof socks allows the water that gets in to get out again, and feet stay (mostly) dry in the meantime.
Socks – I’ve been wearing this combination for a few years, and have found they work really well for me. I have a pair of Injinji toe liner socks next to my feet, and some thin running socks next to them. Injinji are really expensive, but I find they last for years (I’ve been using some 4 year old pairs, from when I did GUCR in 2014), and they prevent any skin rubbing on skin, preventing blisters. The thin running socks are simply there to absorb sweat that comes out of the Injinji. Over the top of these two is a pair of good calf-high Sealskinz, which although not perfect, keep the water out for as long as possible. Three pairs of socks may feel like overkill, but I have used this combination in numerous ultras and they keep my feet problem-free. In the Challenger my feet certainly weren’t dry after 12 hours, but the socks absorbed most of the moisture and my feet stayed clean. I took 2 full sets of the three pairs, and another for emergency that I carried with me.
A quick note here: no waterproof sock will keep your feet dry if you go through every puddle and stream available. I will do everything I can to keep my shoes dry, skipping around puddles and mud until it is absolutely avoidable to get them wet. I don’t like running with wet feet, and the cold would have been serious if my feet had been wet for hours. If there is no danger of feet getting wet, then don’t use waterproof socks, as they are bleeding expensive and hold the sweat inside, basically poaching your feet over a long period of time.
I should also add, that I have great feet! I almost never get blisters or problems, and when I watch people having their feet taped up at events I shudder. I’m just lucky.
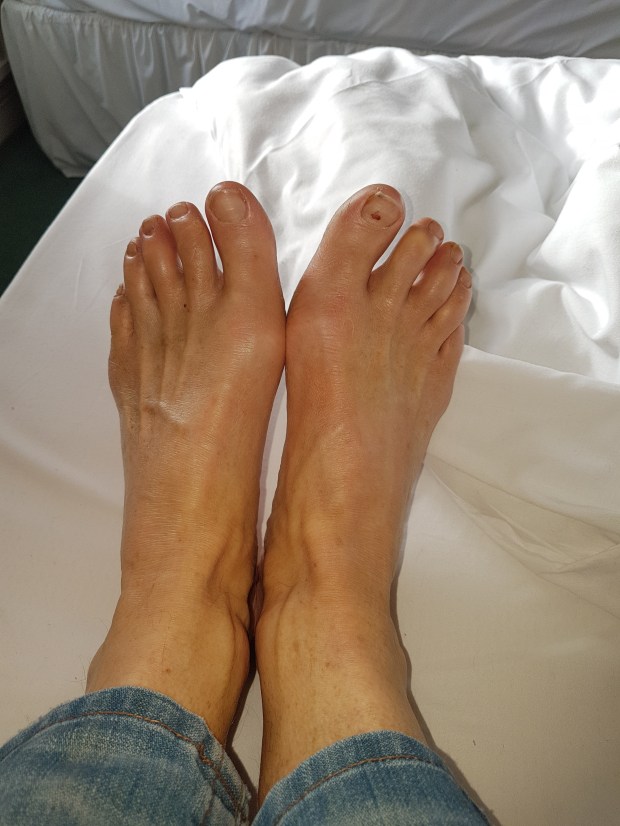
Magic pristine feet!

The feet in the middle are mine after the Thames Ring 250…again, in pretty good shape.
Gaiters: when I’m out running I have a simple pair of dirty-girl gaiters, that cover my ankle and prevent sticks and stones going into my shoes. For Challenger, I invested in a pair of Bergaus GTX gaiters. These are expensive, but are probably one of the most important bits of kit after jacket and shoes. The gaiters have a strong thick strap under the shoes that can be easily replaced when worn out as they are attached by Velcro. The gaiters go from the tops of your shoe (another good reason for using a boot) right up to your knee, and fasten with velco all the way down. They close nice and tightly around your lower leg, and provide superb protection against water and mud. I don’t think you can run in them, but I didn’t try to be fair. They were comfortable and secure, I didn’t have to adjust them at all once I fitted them correctly. I suspect they will last me for years.
Underwear: I wore a pair of compression shorts under my trousers, to keep everything ‘tightly held in’ and prevent any chafing. These minimise any movement of my nethers, and hence no sore bits. They are quite tight to wear for hours, but worth it I find.
Trousers: I had 2 sets of base layers, once was a simple pair of compression tights for the first day that kept my legs warm under a cheap pair of running tights. The second was a pair of merino wool leggings from Mountain Warehouse (about £30). I only bought the merino wool pair as the internet seems to be convinced on the magic qualities of the wool…keeping cool and warm as necessary, and wicking moisture away easily. I have to say this was the first I’ve ever owned, but they did seem to be very comfortable and warm. I’m not convinced they were worth the price however, but as long as they last I will feel they were worth it. I can’t see myself wearing them for any other running events, but possible hiking in the cold.
I wore cheap running tights (from Sports Direct) over the top of both. I started with the compression tights and cheap tights for the first half, when my pace was going to keep my legs warm. After the first day I changed to merino wool and a second pair of running tights, when I expected my pace to drop and my legs to get cold. One the second day of the challenger, when I was in heavy rain and wind, my legs never felt anything other than warm and cosy.
I saw some runners wearing Montane hiking trousers and the like, which I suspect worked fine, but it seemed yet another expense.
Waterproof trousers: I used a pair of Bergaus Deluge trousers as my main pair. They performed well in the heavy rain, and even better they have a long zip up each side so can be put on over shoes – the last thing I wanted out on the trail was to struggle to put trousers on over shoes. I’m not a massive fan of waterproof trousers, but these did a great job without overheating my legs. If you want to have a look a them, go to Go Outdoors, where they have racks of every different type of waterproof trousers in different sizes, and try loads on. It’s like internet shopping but with stuff to try on.
Top base layers – I had 2 merino wool base layers, for similar reasons that the internet said they worked really well. Interestingly, I usually overheat on long runs and I found these worked well. They did fill with sweat if I didn’t vent them on big climbs, but did a great job of keeping me warm.
Top layer – 2 normal winter running tops that I use every year. These are quality Gore Mythos ones that I’ve had for years, but are fleecy on the inside and warm. They have a thumb hole that keeps the arms stretched all the way down to my wrist, which I like anyway, but this proved invaluable on the Challenger, and there was no skin exposed when wearing gloves.
Jacket – the most important piece of kit. I spent hours literally deciding which to get, as I didn’t own a good enough jacket previously. I went for a hard-shell jacket, which was going to be bulletproof in poor weather, but was heavier and less breathable. My recommendation is to go for the best you can afford, and I got a Mountain Equipment Rupal jacket. It was great, and gave me huge confidence when the weather got really bad on the final night. I spent a few nights training in it in the preceding months, so I was very experienced in unzipping to stay cool (it did get very hot on climbs) but I found that it was superbly wind-proof and overall I was really pleased with it. I strongly suggest you do more than internet shop for it though, research and then get into Go Outdoors or Cotswold Outdoor and try it on! (Then go home and order it for as cheap as possible).
Neck gaiter – I just used lots of buffs. I had a really thick one that I didn’t use, and the normal thin buffs did the job, even in strong wind. The added benefit was that they could be pulled up over the chin and nose if the wind was biting cold on exposed skin.
Hat – I took one very warm waterproof hat, that I got cheaply off the internet a few years ago, and wore at night. My jacket hood kept the rain off when the rain started so it didn’t need to be particularly waterproof, just warm. During the day, or if it was too hot, I used a buff on my head instead.
Quite a few people had peaked caps, to shade their eyes from the sun (I always run in one) but luckily we had not one scrap of sun the whole time.
Headtorch – I usually use a Petzl myo, which I find does everything I want and had great battery life. For the Challenger I traded up to a Petzl Nao plus, which was horrifically expensive (really really expensive) but after a recce in November with the Myo, I wanted more light for the night sections (i.e. most of it). I found the Nao plus gave loads of light (750 lumens I think, for 16 hours) and I liked the reactive lighting (which meant it dimmed in well lit areas to save battery), but in truth I didn’t like the rechargeable battery which forced me to buy a spare rechargeable battery just in case required out on the trail, and was fiddly to change. The charge time is 6 hours too, which meant it wasn’t possible to fully recharge while at an aid station. You can control the torch through an app, which also tells you how much battery life you have left….but it’s a gimmick.
I also took the Myo with me as a spare, just in case, and spare batteries for both torches. The Nao plus worked superbly on both nights I was out, and although it was overkill it did a great job.
Goggles – part of the mandatory kit, these were probably the most alien thing I’ve ever taken on an ultra. However, I read reports of racers having to retire a few years ago due to scrapes on their cornea from strong winds, so they are not to be ignored. I wear glasses, so I have a slight advantage in winds that others don’t, and for that reason I was perhaps a bit blasé about the goggles. I read lots of suggestions about them, and in the end I went for a reasonable pair of safety goggles from Screwfix. They have them on display in the shop-part of a screwfix, which meant I was able to try them on over my glasses. I read that a clear pair is much better at night than a yellow tinted pair (which is used for skiing), and mine were quite comfortable. I never actually used them, even in really strong wind.
Gloves – this was really interesting. I was clear that I needed a couple of good pairs that would keep my hands warm in the rain, and also a light flexible pair if it wasn’t raining. So this is what I ended up with – my normal thin running gloves, a pair of tough waterproof thermal gloves from Screwfix, a pair of thick Mountain Equipment mittens, and finally a pair of Sealskinz gloves that I bought at the last minute and didn’t actually use. The thin gloves were fine, but every gate or style that was wet was going to get my gloves wet, and cool my hands. The Screwfix waterproof gloves fitted really well over these gloves and protected them from any moisture, especially when going through the boggy section where I could easily slip and put my hand on the ground. These were basically rubber gloves, but I wore them more than any other glove especially when it was properly raining. My mittens are gorgeous and very warm, and I wore them every evening as the light fell and it got much colder. They are Primaloft, so warm when wet, and would be my glove of choice in the real cold. When I did my recce, I was able to put hand warmers into the mittens which kept my hands toasty when I was getting cold.
Overall, I have learnt that if my feet, hands and neck/head are warm then the rest of my body generally follows. Hence socks / gloves / buff & hat are probably the things that I already knew what worked for me, and I didn’t have to look around too much.
The only other bit of clothing I took, but didn’t actually wear in the end was a decent warm Rab microlight jacket, that fitted easily under my hard-shell, and kept me fantastically warm when I got really cold. It packed down to tiny proportions, and weighed about 250g, a worthwhile trade-off for the heat and confidence it gave me. I didn’t actually use it, but it was my “hypothermia-preventer” if I had needed it.
I was really tempted to carry more layers, t-shirts or more long sleeved tops that I could put on if required, but I kept them in my drop bag and in the end didn’t require them.
Rucksack – OMM classic 32ltr. Was bigger than I needed, and I had to be controlled so that I didn’t fill it with even more stuff, but I’ve used it a lot and it fits well. I especially like the various pockets it has on the waist belt and top. I used an OMM trio front pack, which was great, very big (4 ltr) and hold everything I needed for easy access. I had a single water bottle fitted to one of the shoulder straps woth an OMM pod, worked very well.
GPS unit – Garmin Etrex 30. I’ve had this for a few years, and it is simple to use but very good. If you don’t use one much at the moment, then get out and use it, especially if you aren’t very technological gifted. It is a bugger to get used to, but I can strongly recommend to make your mistakes when you’re not in a race. Please don’t underestimate this, unless you are an expert map reader. I can read a map, but not after 40 hours with no sleep, and the GPS saved me more than once.
Sleeping bag & bivvy bag. Dead simple…Alpkit Pipedream 400 and Hunka XL bivvy. The sleeping bag is good down to -6 degrees, and I slept outside in frosty weather in November with no problems. It weighs 800g, which is heavy, and is quite bulky, but it is such a reasonable price it seemed daft not to get one. The XL bivvy seems to be decent, but quite small (even though XL) for me – I’m 6ft.
Rollmat – also from Alpkit.
Stove – I used an MSR pocket rocket, and a titanium pot from Alpkit with waterproof matches from the internet. I didn’t take a heavy wind blocker, but a couple of pieces of stiff silver foil (cut down bits of silver tray) that would work if I couldn’t find any shelter. I didn’t use them in the end, but practised until I could set them all up, boil 2 cups of water to make cup-a-soup, drink and pack up in just under 10 mins. Even in that short time I was getting really cold (practice when out hiking, not in your kitchen!), so it is vital to practise to be quick. I was tempted to go for a jetboil or something similar, but I love the compactness of the kit I had.
Yaktrak pro – mandatory kit, didn’t use them, but the ice on the last night was eye-opening, so I almost used them. You need to practice putting them on! Get them cheap from the internet (mine cost £7.50, they are £20 in the shops)
Maps – a lot of people used the OS A-Z for the Pennine way, which has a highlighted line over the Pennine way. I went a bit more down-market, and cut up the required OS explorer map (i,e. waterproof and pretty bomb-proof) into A4 sized chunks. These were numbered 1 to 17, and each covered about 6-12 miles of the route. Hence, I could have a single piece of map in front of me, that was quite small and manageable, and I would change for the next map every few hours when I got to the top of the page. Worked really well (but it felt like heresy to cut a map up). I saw people using Harveys maps, but I really struggle with their scale. I’m sure I don’t need to say it, but please practice map reading a lot, even if you don’t intend to use them. Your GPS will do a lot for you, but confidence in your own abilities to get you out of trouble will be important.

Pages 2 & 3 of my cut-down maps….I have 17 in total (but only needed 1-8 for the first leg, then 9-17 for the second half after checkpoint.
And what else did I take?
Hand-warmers, from Tesco, one use only but stayed warm for 10 hours on my recce which was was beyond my expectations.
Plastic poncho, to protect in case of poor weather. These take up no space, are very light, and made me feel confident. I used on on the last night, and seemed to help (but that may be down to my bulletproof jacket).
Rubber gloves – plain old Tesco washing-up gloves, very light, which I kept on the outside of my pack and used when I took my disgustingly muddy boots and gaiters off. Purely psychological, but I hate to get my hands covered in bog when taking my shoes off.
Waterbottles, obviously. If using one with a bite valve and straw from the bottle, do put a bit of insulation on them. I found that while my straw didn’t freeze up (it was wrapped in felt and duct tape), my bite valve would crack when I used it as the water inside wiuld freeze. I learnt to blow the water out, back into the bottle, after every drink.
Food – tough one this, as everyone is different. I took 2 freeze-dried meals in my rucksack, 1000kcal each, in case of emergency. In my front pack I had a small bag of ‘nibbles’, like bars of chocolate, a cheese roll, a pork pie, boiled sweets, flapjack etc. It was about 12 hours worth of food for me, and I carried an identical bag in my rucksack. It worked well for me but obviously there were people there hardly eating anything from their pack and relying on cafes and pubs.
Spare shoelace. Just in case.
First aid kit, as required, and the smallest sharpest penknife I could find that had a pair of scissors on it. Look on amazon.
Phone, iPod, headphones…not necessary, but very welcome in the night. I also carried a charging block & lead, but didn’t use it…it just made me feel safer.
Poles – can’t forget these! I’m quite a fan of poles up the ascents, and used them for the Arc of Attrition and on the Spine. I know there are loads of sexy thin pair around, but I also read that alot of the thin ones get broken on the spine as there are a lot of nooks and crannies for the tip to slip into and get snapped off when you keep moving forward. On my November recce that was exactly what happened to me. So my pole of choice is…Amazon best seller “Pair of Trekrite Antishock Hiking Sticks / Walking Poles – Black”. These are chuncky and strong, and even when I did snap the tip off one on my recce I still used it for days. They are telescopic, which means they are bulkier than folding poles, but they work fine. Best of all they are £20. They weigh 285g each, which is loads, but I think worth it (Black Diamond are £80 and only a little lighter). Personally, I’d rather spend my money on a better jacket or solid gaiter than poles, but that’s just me.
I should point out that if I was in an event that only used poles for a small amount of time, these would be a nightmare to carry with you until they were required, so I’d probably get something smaller….but for Challenger, perfect. Oh yes, almost forgot, put duck tape around the top third of the pole, as it’s much warmer on bare fingers than the metal pole when holding them.
This is me at the end of the Challenge, after 6 hours of proper spine weather…you can see my front set-up.

Nothing dry!
My GPS is the grey think hanging in front of the OMM front-pack. I kept it there to be able to refer to it easily, rather than getting it out of a pocket. It was fixed to the front-pack with velco.
And my drop bag….
Two compartments at either end. One was filled with the immediate stuff I’d need to swap my muddy shoes out at the checkpoint aft erthe first day – plastic gloves (for keeping hands clean when getting boots off), bin liners (for dirty boots & gaiters), kitchen towel (to dry feet), crocs (for keeping bare feet of the ground…I wanted my soggy feet to dry out as much as possible, so they needed to spend some time in the air, without socks on, so used crocs. Not very good, as they were a bit restrictive and tight on my tender feet, I would have been better with soft sandals).
In the other compartment was all the ‘important’ stuff for the checkpoint that wasn’t clothing…about 3 charging blocks & leads (for charging head torch rechargeable battery, watch, phone), spare batteries (for GPS), replacement hand warmers (if I had used them in the fist leg, I would remember to replace them).
In the mid section of the drop bag was everything else! Complete change of clothing for the second half of the race (and a bin liner for all the dirty clothes to go in), small towel (which I didn’t use, probably a bit of a luxury to be honest), more spare batteries, maps for the second half,
And obviously the most important thing….a checklist ot make sure I did everything I needed to. With only one crack at the checkpoint & dropbag, you simply cannot forget anything, and no matter what you think your mind will not be running at 100%. Doing yourself a checklist also means you have run through what you need to do at the checkpoint previously, and so save you thinking on the day. It doesn’t need to be complicated, but it’s vital. Even though I had ‘fill water’ on mine, I was so keen to be on my way that I forgot…idiot!
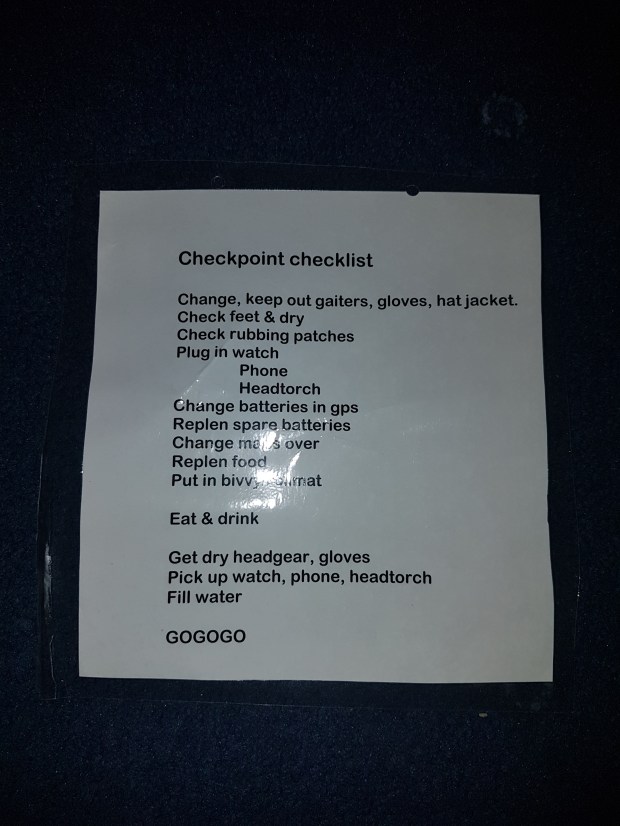
Naturally, it doesn’t say “call the wife”, but I did.
And what else can I suggest…
Personally, I had all the big elements of my kit sorted by start of November, ready for a recce for a few days and a test of the kit. That gave me a chance to replace if things didn’t work, and also allowed me to use the vital Xmas period to justify spending yet more money on the smaller bits. Even more important, that allowed me to shop around and get everything at internet-cheap prices. Also, that allowed me to use November to practise will full race kit, clothes and pack, to get used to it. I cannot stress enough how important that is…you need to know where everything is without thinking about it (for example, I always put my gloves in the same pocket, so I always knew where to find them…as lack of sleep starts to bite that becomes really important as I found on the Thames Ring 250).
Training on muddy hilly ground is crucial, just to get used to it. I was driving for 45 mins to get to my cliffs, and then spending 7 hours going up and down, before driving home. Best to do this at night too…good practise, and also you are home for 10am Sunday morning and a day with the family (I didn’t say this was easy!). Also, staying up most of the night and then the rest of the day is great practise with sleep deprivation.
The few weeks beforehand, spend some quiet time working out what you want to achieve…not so much a finishing time, but if the weather and conditions get really poor, what is going to give you the motivation to keep going rather than DNF’ing. This sounds a bit cheesy, but you will be tested to the max out there, and it’s a big expense to quit halfway.
Read every race report that you can find, even if they scare you to death. It’s critical to know what to expect & where you will hit the big ascents. I didn’t watch videos of Pen-y-Ghent before hand (there is a link in my race report) but with hindsight I should have. Some people had used Google streetview to look at areas they could get to, but that is (perhaps) going a little to far. The internet has huge resources!
And finally, enjoy the experience. It’s not about a couple of days on the pennine way, but rather about taking on a huge challenge and spending 6 months getting ready for it. I’m sure there are some people who started preparation in December, but they are better than me! I’ve been left with a massive sense of achievement, as well as a “job-well-done” feeling, that is worth all the hassle.

Great race report: can’t wait to have a go at this next year.
LikeLike